04. Branching Effectively
Alright! Now that you've learned how to create, list, and delete branches, let's put that knowledge to use!
First, make sure we're on the same page and have the same starter code. We're going to be working in the new-git-project project. The project has the following files:
index.htmlcss/app.css(empty)js/app.js(empty)
The CSS and JavaScript files are empty. Make sure the index file has the following content:
<!doctype html>
<html lang="en">
<head>
    <meta charset="utf-8">
    <title>Blog Project</title>
    <meta name="viewport" content="width=device-width, initial-scale=1">
    <meta name="description" content="">
    <link rel="stylesheet" href="css/app.css">
</head>
<body>

    <header>
        <h1>Expedition</h1>
    </header>

    <div class="container">
        <main>

        </main>
    </div>

    <footer>
        Made with ♥ @ Udacity
    </footer>
    <script src="js/app.js"></script>
</body>
</html>
Project Is Set Up
Task Description:
Before we proceed, let's make sure we have the same setup. Check off each of the following:
Task Feedback:
Fantastic work! Let's get crackin'!
The Game Plan
Right now we have all of our code on the master branch (which is the default branch). We're about to work with branches, by:
- adding content to them
- creating new branches
- switching back and forth between them
Let's use branches to make the following changes:
- on the master branch - add a default color to the page
- create a sidebar branch - create a sidebar for the page
- on the master branch - change the heading of the page
- on the sidebar branch - add more content to the sidebar
- create a footer branch - add social links to the footer
Change 1 - Add Page Color
Make sure you're on the master branch and add the following content to css/app.css:
body {
    background-color: #00cae4;
}
Save the file. Then add the file to the staging index and commit it to the repository.
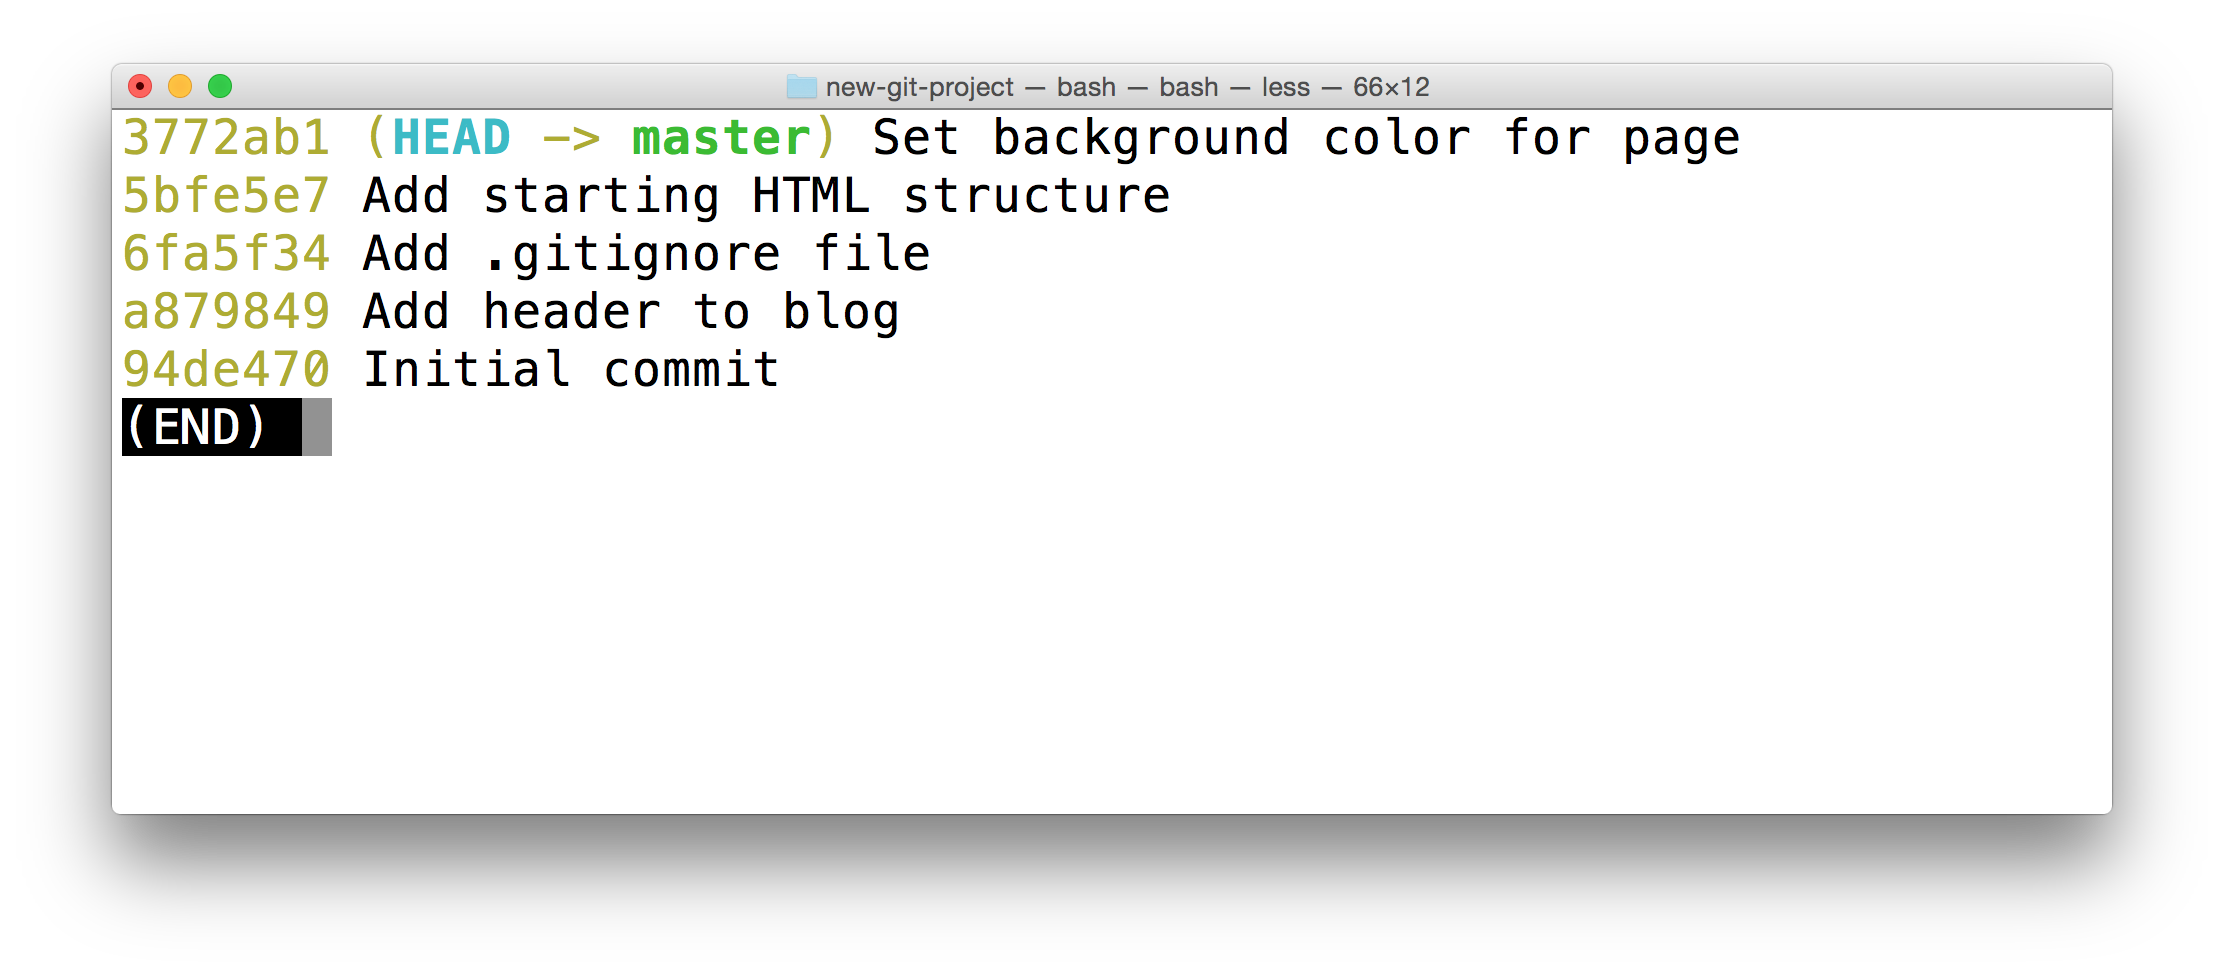
The Terminal application showing the output of the git log --oneline --decorate command. The most-recent commit adds a default background color to the page.
Change 2 - Add Sidebar
Let's add a sidebar to the page. But let's say that we're not really sure if we like the new background color. So we'll place the sidebar branch on the commit before the one that sets the page's color. Your SHAs will be different, but, for me, the commit that's before the one that adds the color has a SHA of 5bfe5e7. So adding the branch to that commit would look like:
$ git branch sidebar 5bfe5e7Now use the git checkout command to switch to the new sidebar branch. Running a git log --oneline --decorate shows me:
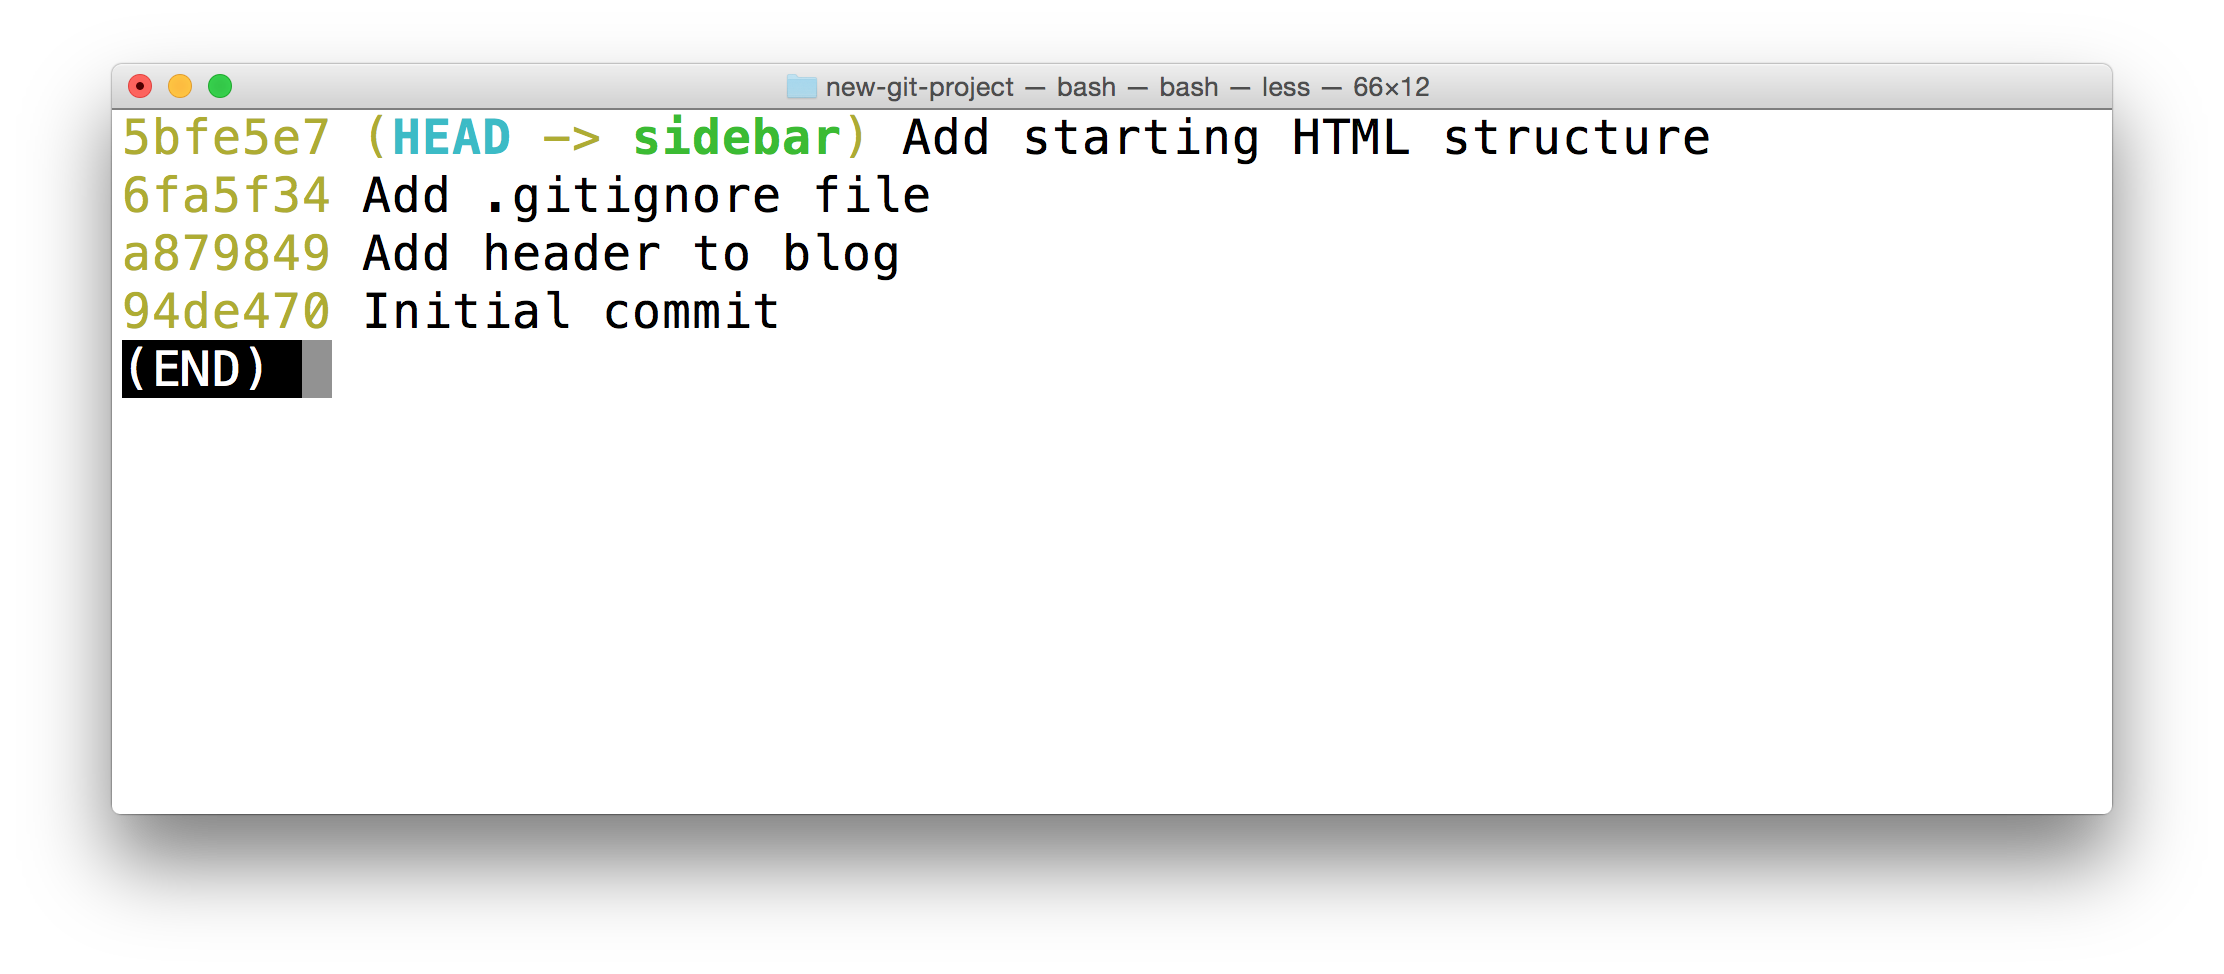
The Terminal application showing the output of git log --oneline --decorate. The output does NOT include the master branch - it has disappeared.
Did you notice that the master branch does not display in the output? Where did it go!?! Is it lost? Don't worry, it's still there, we'll see how to get it to display in just a second.
But first, in your code editor, switch to the app.css file. Notice that it does not have the CSS we previously entered! Because of this, if you load the project up in the browser, the page won't have a colored background. This makes sense since the CSS file is empty, but do you know why?
Where's the CSS?
SOLUTION:
The content is stored safely on another branch.Nd016 WebND Ud123 Gitcourse BETAMOJITO L5 54 Content On Different Branches
Create a sidebar by adding the following <aside> code to the HTML file:
<div class="container">
    <main>

    </main>
</div>

<!-- start of new content -->
<aside>
    <h2>About Me</h2>

    <p>Lorem ipsum dolor sit amet, consectetur adipisicing elit. Eos, debitis earum molestias veniam suscipit aliquam totam exercitationem tempore neque vitae. Minima, corporis pariatur facere at quo porro beatae similique! Odit.</p>
</aside>
<!-- end of new content -->

<footer>
    Made with ♥ @ Udacity
</footer>
I added my <aside> content next to the <main> element as a fellow child of the <div class="container"> element.
Feel free to add any content inside the <aside> element!
⚠️ Don't Change the CSS
WARNING: It's very important that you do not change the CSS file.
We'll change it later, but if you make a change right now, we'll end up having what's known as a "merge conflict". We'll manually cause a merge conflict in a bit, but we don't want to have one right now, so just don't make any changes to the CSS file, yet.
Task Description:
We're done with this step, so it's time to commit the changes.
Task Feedback:
Great job! 🎉
Change 3 - Change Heading On Master
Let's switch back to the master branch and update the page heading.
Use the git checkout command to switch back to the master branch. (Notice that the HTML for the new sidebar is no longer there(!) because all that code is stored safely on the sidebar branch.)
Now change the <h1> heading of the page from "Expedition" to something else. How about something exciting like the word "Adventure"!?!
See Changes Made?
SOLUTION:
git diffHeading Change Have Been Saved And Committed
Task Description:
Now it's time to save the index.html file and make a commit to add this change to the repository. (I used the commit message "Improve site heading for SEO", but see if you can think of a better one)
Task Feedback:
Stupendous job!
Change 4 - Add More Content To Sidebar
Switch back to the sidebar branch (notice, again, that content we've added to the master branch isn't visible on the sidebar branch).
Now just add some content inside the <aside> element. Add something about yourself - your favorite movie or book (my favorite is LOTR!). Anything will work, you just need to add some content.
Again, make sure that you do not make changes to the CSS file.
Now save the index.html file and make a commit.
Change 5 - Add Social Links To Footer
We've made a number of changes, and we're about to make our last one. Let's add some social icons to the page's footer. For grins and giggles, let's make this change on a new footer branch that's based off the master branch. So we need to create a new footer branch, first.
💡 Switch and Create Branch In One Command💡
The way we currently work with branches is to create a branch with the
git branchcommand and then switch to that newly created branch with thegit checkoutcommand.
But did you know that the
git checkoutcommand can actually create a new branch, too? If you provide the-bflag, you can create a branch and switch to it all in one command.
$ git checkout -b richards-branch-for-awesome-changes
It's a pretty useful command, and I use it often.
Let's use this new feature of the git checkout command to create our new footer branch and have this footer branch start at the same location as the master branch:
$ git checkout -b footer masterNow if we run a quick git log --oneline --decorate, we should see (your commit messages might be different):
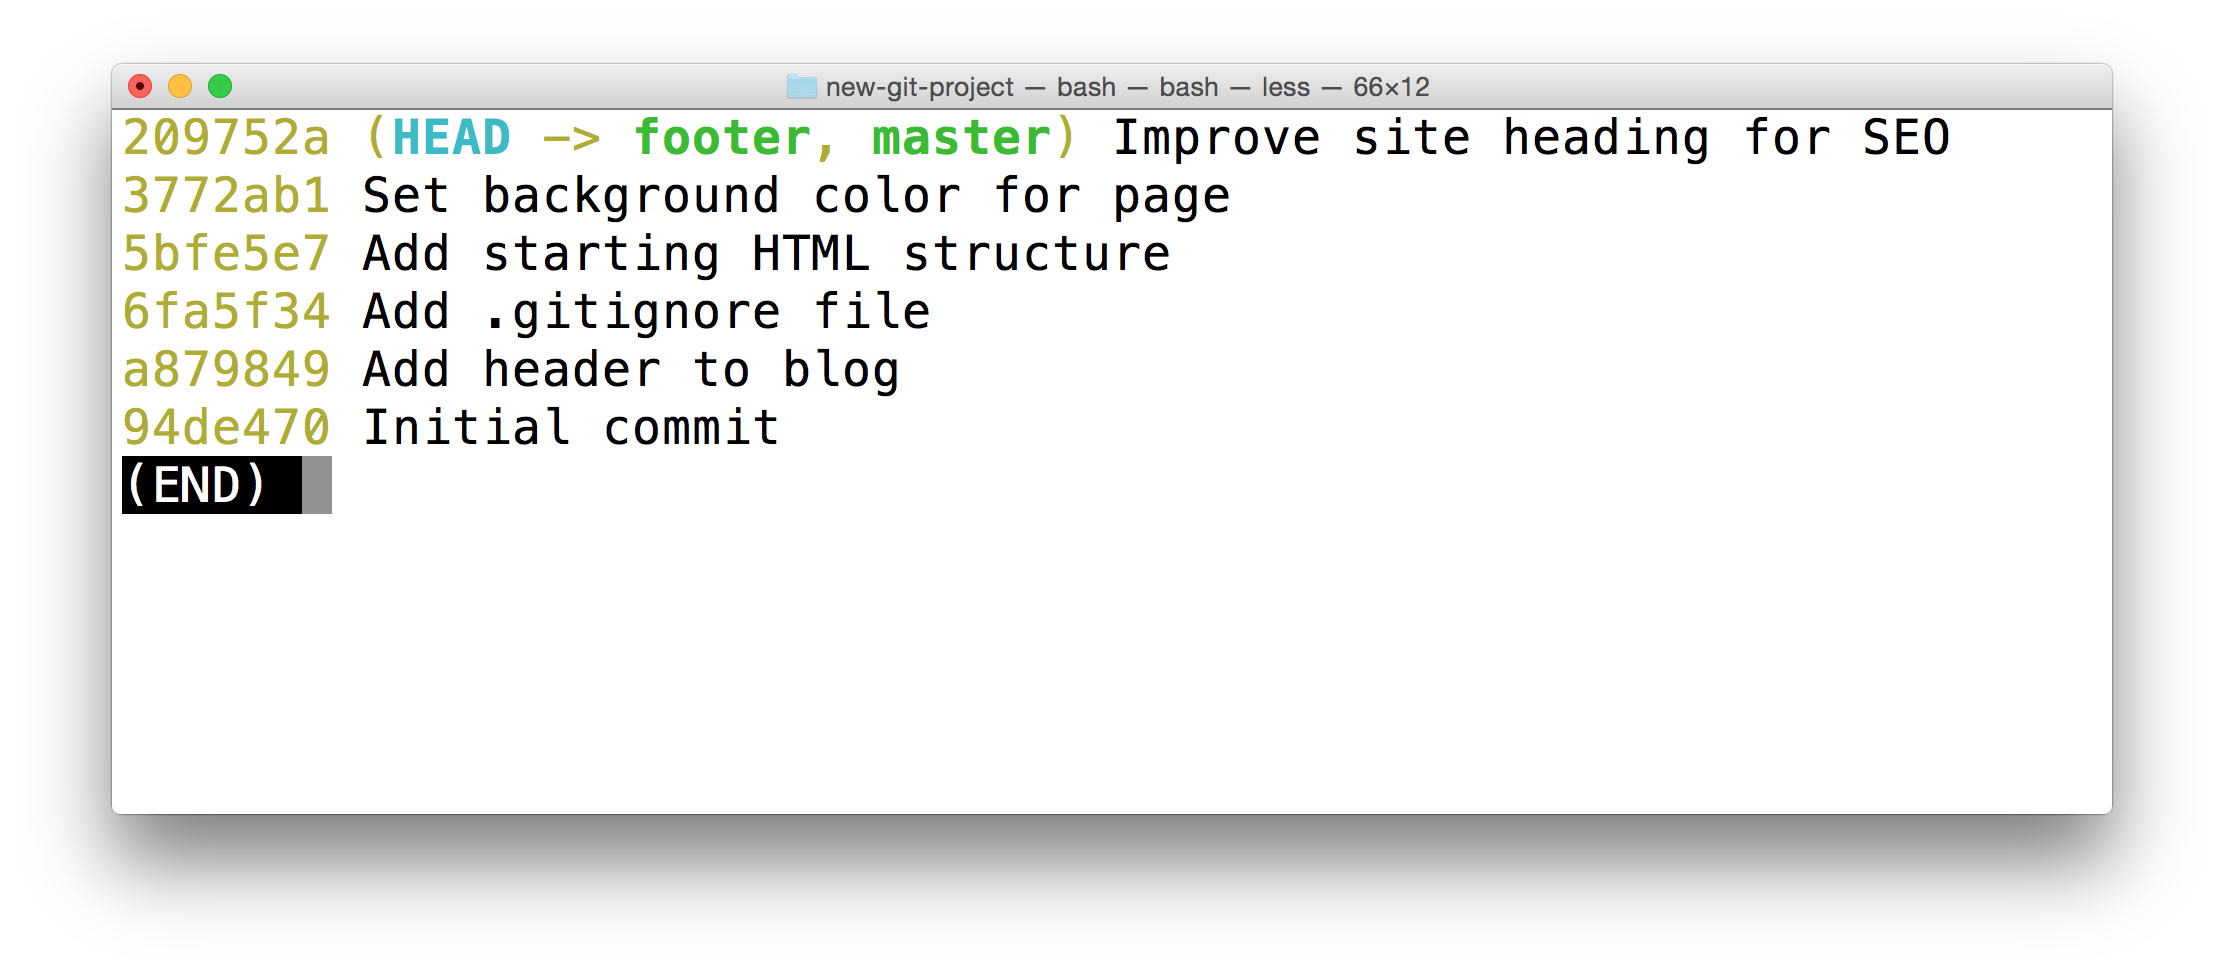
The Terminal application showing the output of git log --oneline --decorate. The special HEAD pointer is pointing at the footer branch. The footer branch is on the same commit as the "master" branch.
Add Social Links
Now that we're on a new branch, let's add some social links to the page's footer. I've added the following content:
<footer>
    <!-- start of new content -->
    <section>
        <h3 class="visuallyhidden">Social Links</h3>
        <a class="social-link" href="https://twitter.com/udacity">
            <img src="img/social-twitter.png" alt="Twitter">
        </a>
        <a class="social-link" href="https://www.instagram.com/udacity/">
            <img src="img/social-instagram.png" alt="Instagram">
        </a>
        <a class="social-link" href="https://plus.google.com/+Udacity">
            <img src="img/social-google.png" alt="Google Plus">
        </a>
    </section>
    <!-- end of new content -->
</footer>
Feel free to link to your own social accounts.
Task Description:
Now save the file and make a commit. (I used the commit message "Add links to social media", but definitely try coming up with a better one)
Task Feedback:
Outstanding work! 👏
See All Branches At Once
We've made it to the end of all the changes we needed to make! Awesome job!
Now we have multiple sets of changes on three different branches. We can't see other branches in the git log output unless we switch to a branch. Wouldn't it be nice if we could see all branches at once in the git log output.
As you've hopefully learned by now, the git log command is pretty powerful and can show us this information. We'll use the new --graph and --all flags:
$ git log --oneline --decorate --graph --allThe --graph flag adds the bullets and lines to the leftmost part of the output. This shows the actual branching that's happening. The --all flag is what displays all of the branches in the repository.
Running this command will show all branches and commits in the repository:
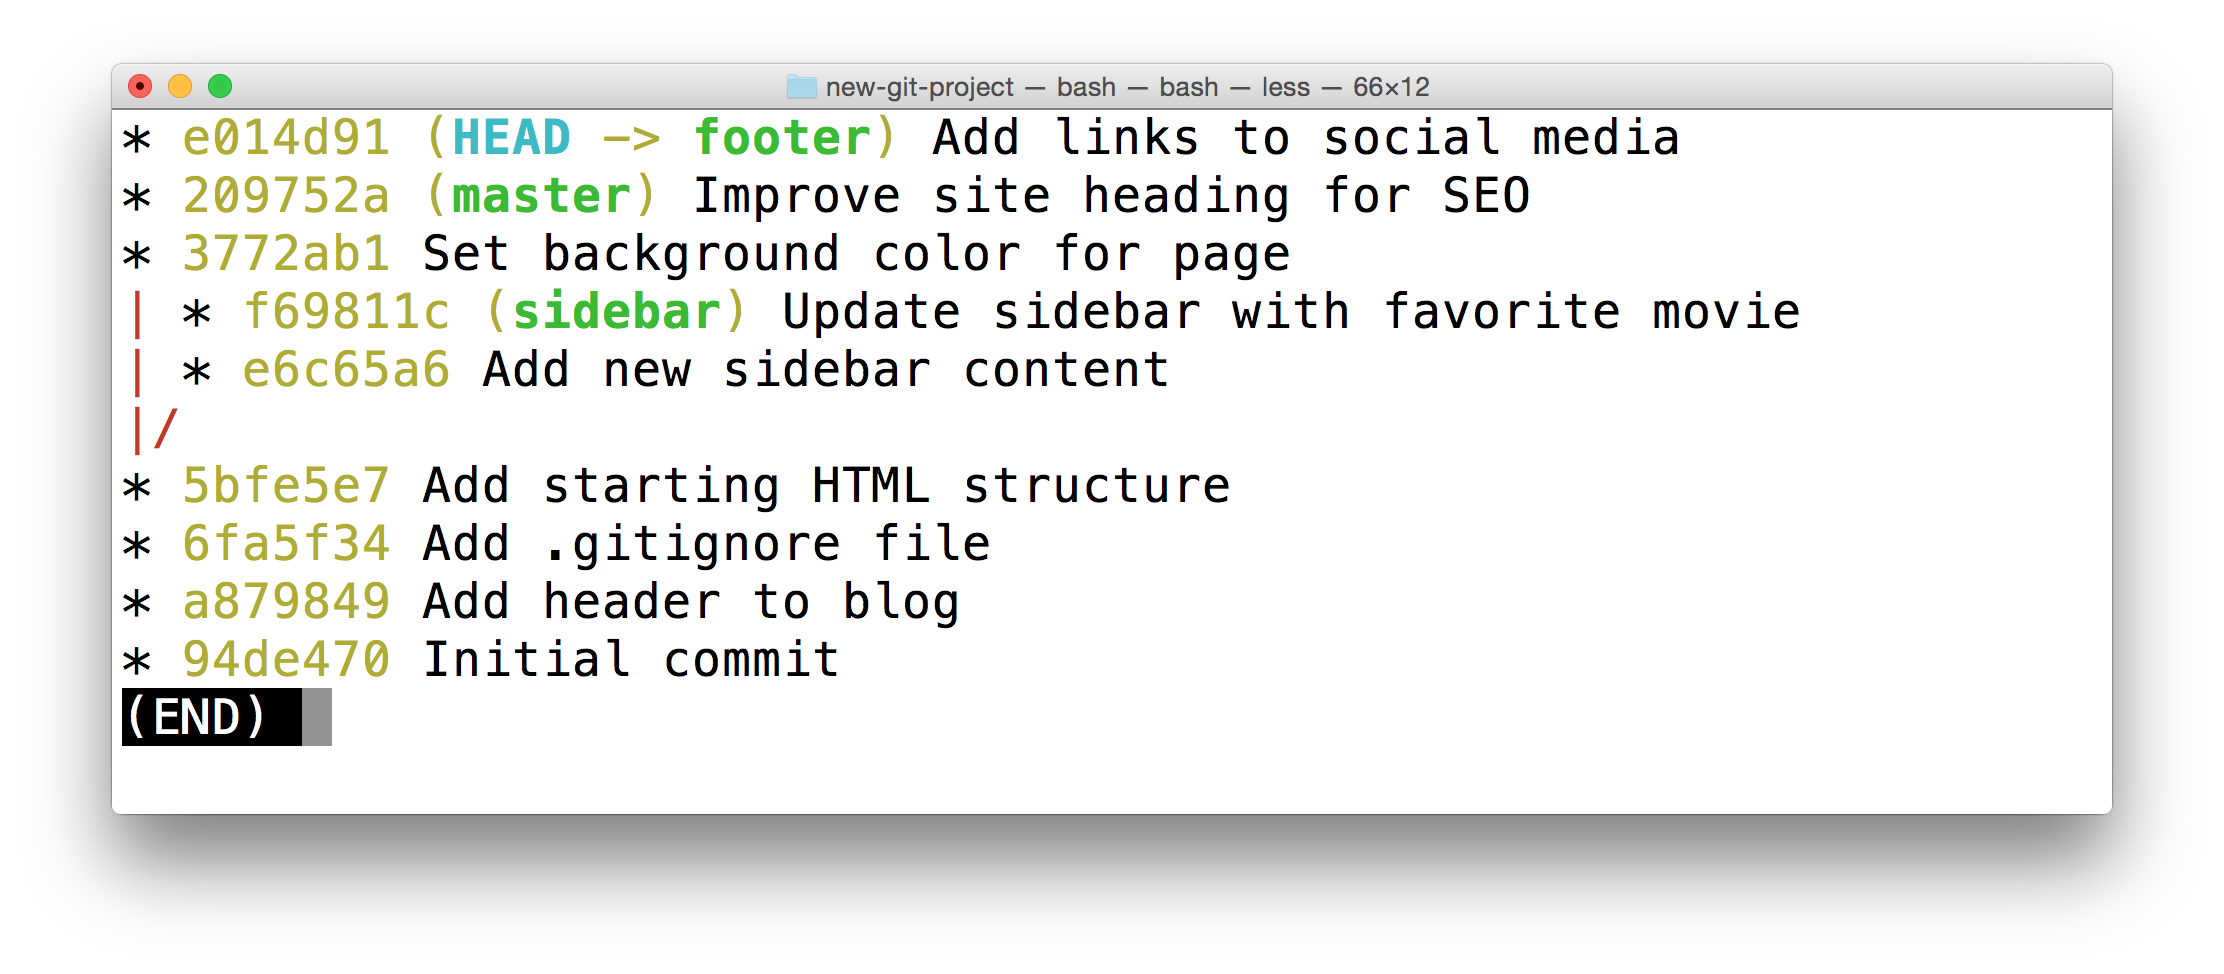
The Terminal application showing the output of git log --oneline --graph --decorate --all. This shows all branches and therefore all commits in the repository.
Recap Of Changes
We've made the following changes:
- on the master branch, we added a default color to the page
- we created a sidebar branch and added code for a sidebar
- on the master branch, we changed the heading of the page
- on the sidebar branch, we added more content to the sidebar
- we created a footer branch and added social links to the footer
These changes are all on their own, separate branches. Let's have Git combine these changes together. Combining branches together is called merging.